Showing posts with label Travel and Tours. Show all posts

Sunday, June 26, 2016

Kayaking in the Black Canyon

Kayaking in the Black Canyon
June 11, 2016

The weekend prior had a scorching high of about 109 degrees. But on this day, the weather was on point. What a great day to kayak!


Blazin Paddles Kayak Tours - curiousadventurer.blogspot.com
It was an excellent day to kayak with Blazin Paddles.


kayaking adventure with Blazin Paddles - curiousadventurer.blogspot.com
I love this!

I invited my stepson, Trevor, and our family friend, David, to join me in this adventure. Ever since I showed Blazin Paddles’ Facebook pictures to Trevor, he was all gung-ho about going. He was even more excited that Blazin Paddles’ headquarters was close to a Roberto’s Taco Shop. We made a pit stop there, where he and David each chowed down a breakfast burrito before heading out to the tour.


Blazin Paddles Shuttle - curiousadventurer.blogspot.com
This was our sweet ride to the launch area at Willow Beach.

Getting there by Blazin Paddles Kayak Tours - curiousadventurer.blogspot.com
From Boulder Highway, en route to our destination, we could already see a hint of the water. 

We reached the launch area at Willow Beach Marina after a 40-minute shuttle ride from Blazin Paddles’ Henderson office. Ryan Borup, the owner of Blazin Paddles, explained that we were on the Arizona side of the Colorado River a few miles downstream from Hoover Dam.

While Ryan prepped the kayaks, we had time to walk around the marina, use the facilities, and visit the sundry shop for last-minute essentials. There were a few families already picnicking nearby and just kicking back.

Willow Beach kayak launch area - curiousadventurer.blogspot.com
Our kayaking playground for the day

duck in clear water at Willow Beach - curiousadventurer.blogspot.com
This duck was already having a grand time in the crisp and clear water.

The water was so inviting! It was clear and so was the sky that framed it. From a distance, we could see only a handful of adventurers and a family of ducks that already beat us to the water.

Getting ready to launch, we approached the bright colored kayaks already lined up on the shore.  Each was already equipped with a paddle, a life jacket, and...a water gun! A sure sign of more fun things to expect.

Blazin Paddles kayak and water gun - curiousadventurer.blogspot.com
Also on the front of each kayak was a water gun strapped onto the bungee cords.

Ryan, assisted by companion guide Jackie, instructed us to put on our life jackets. Safety first! He followed that up with quick tips on how to get in and out of the kayak without tipping over. Then he demonstrated how to properly hold the paddle and effectively maneuver the vessel.
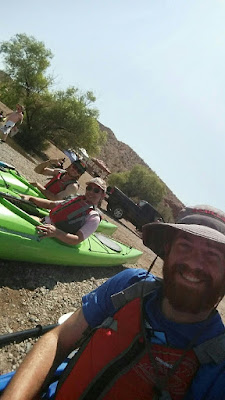
kayak adventure with Blazin Paddles - curiousadventurer.blogspot.com
Excited to launch. Let's do this!

I quickly loaded my snacks inside the rear storage compartment of my chosen kayak. Then I tucked away my iPhone, protected inside a ziplock bag, in the small hatch in front of the cockpit.  Before long, we were off.

I chatted with Ryan as we leisurely paddled to our first destination. He grew up in Alaska where his father was stationed while in the military service. That explains his love of the outdoors and how he was somehow led to this business.

Meanwhile, Trevor behind me asked, “Um, is there a better way to paddle? I seem to be all over the place.” 

“That could mean your one arm is stronger than the other,” Ryan replied as he gave him advice on how to make adjustments.

Later, when I lagged behind, I chuckled as I watched him zig-zagging ahead of me.


kayak adventure with Blazin Paddles - curiousadventurer.blogspot.com
After a few adjustments, Trevor got the hang of it and was kayaking like a pro.

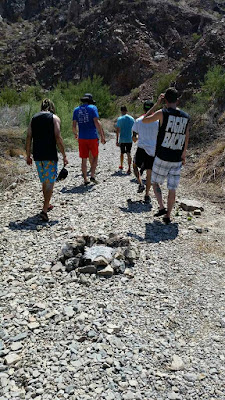
Along with three other guys in our group, we went for a short uphill hike to explore the location. We had to take pictures of the gorgeous view of the Black Canyon from up there. 

Black Canyon kayak tour with Blazin Paddles - curiousadventurer.blogspot.com
Gorgeous view of our kayaking location.

Black Canyon kayak tour with Blazin Paddles - curiousadventurer.blogspot.com
Our group walking past a fire pit as we made a short uphill hike.

Black Canyon kayak tour with Blazin Paddles - curiousadventurer.blogspot.com
Our group photo with Black Canyon as our backdrop

Ryan is very knowledgeable about the history of the area. Throughout the tour, he showed us some interesting sites and told us fascinating facts. He emphasized that the water here remains 55 degrees year-round. During our second stop, we bravely took a hasty dip in the freezing water. It was refreshing but I could feel my hands going numb.

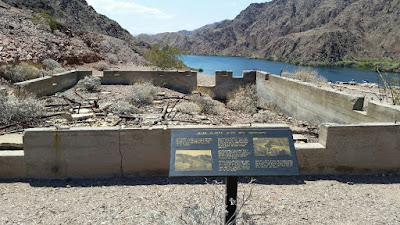
It was in this spot that I noticed an old-fashioned wooden cart suspended on cables. I also saw a make shift trail that ribboned along the canyon edge. On the opposite canyon wall, there was an outpost with ladder accessibility.

Apparently, these intriguing structures were part of an old gauging station. There were several used during the construction of Hoover Dam. Back then, a gauger would walk along the trail to get on the cart. Then using the cables, he would pull himself to the measuring station and monitor water levels. As part of the tour, Ryan showed us remnants of a river gauger’s house nearby. It’s incredible to see these remains from the 1930’s.


River Gauger's House, Black Canyon - curiousadventurer.blogspot.com
What remains of a 1930's river gauger's house

One highlight of our tour was when we all backed into Emerald Cave one at a time and created a sardine-like formation inside. We gazed in amazement at the emerald green water in front of us.

Emerald Cave, Black Canyon kayak tour - curiousadventurer.blogspot.com
Inside Emerald Cave

Emerald Cave, Black Canyon kayak tour - curiousadventurer.blogspot.com
When the sunlight hits the water, it reflects back hues of emerald green.

Emerald Cave, Black Canyon kayak tour - curiousadventurer.blogspot.com
"Awesome!" David gave it a big thumbs up.

Then we were led to a jump-off point. It was fun to watch the boys take a leap from the 30-foot cliff. Sadly, my attempt to take videos of their jump failed. But you can visit Blazin Paddles’ Facebook page or their website (fully functional by July 1, 2016) to see more photos and videos.

On our way back, it was so relaxing to just paddle away. I liked it best when there weren’t any boats or jet skis speeding by. It was nice to enjoy our surroundings with peace and quiet. Both Ryan and Jackie said that they typically spot bighorn sheep around here. But they camouflage so well that sometimes you don’t easily see them.

During the home stretch, we hit some wind. That sure tested my endurance. I felt like I grew some muscles because I powered through it. Though snacks were provided during the tour, I was ready for my packed sandwiches by the time we got back. We all agreed it was a great time and that we want to return and do it all over again!


Blazin Paddles Las Vegas - curiousadventurer.blogspot.com
Jackie and Ryan from Blazin Paddles took us on a fun kayaking adventure we won't forget

Ryan Borup of Blazin Paddles LLC - curiousadventurer.blogspot.com
Ryan Borup of Blazin Paddles Kayak Tours

Helpful Info

Cost:
Half Day Tour: $135/person (3 hours water time); snacks and water included
Full Day Tour: $185/person (7 hours water time); includes lunch and trip to hot springs
*They also have a Twilight Tour that launches around 5:00 p.m. and includes a campfire activity.

What to Wear: 
Swimsuits, water tees and shorts, hat, water shoes or closed toe shoes (You will get wet.)
Don’t forget to put on sunscreen.

What to Bring: 
Some snacks and water will be provided. You are welcome to bring additional snacks and drinks.

Getting There: 
Although locals can meet at their Henderson Office, they do pick-up/drop off on the Strip. 

Other Tips: 
Make sure you are physically fit to join the kayaking tour. Though not necessary, it may be helpful to watch a video on how to kayak properly. Then you're all set!


Sunday, September 13, 2015

Palace Restored. Heritage Preserved.

Kyoto Imperial Palace
October 9, 2014
Part Three of JTB Tour 1


Steeped in culture, the beloved Kyoto was Japan's capital for over 1,000 years. The Kyoto Imperial Palace was the residence of the Imperial family until the capital was moved to Tokyo in 1869. I feel so fortunate to have visited this historic site.

Shishinden, Kyoto Imperial Palace - www.curiousadventurer.blogspot.com
Behind me is the iconic Shishinden, the ceremonial hall of the Kyoto Imperial Palace.
Oikeniwa Garden, Kyoto Imperial Palace - www.curiousadventurer.blogspot.com
Alan in front of the Oikeniwa Garden's tranquil pond with the Keyakibashi Bridge in the background.

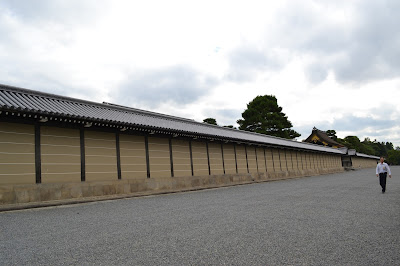
Located in Gyoen park, the Kyoto Imperial Palace grounds are enclosed by a massive wall. The entire area, which spans approximately 27 acres, is filled with magnificent structures that display Japan's architectural styles and cultural heritage.
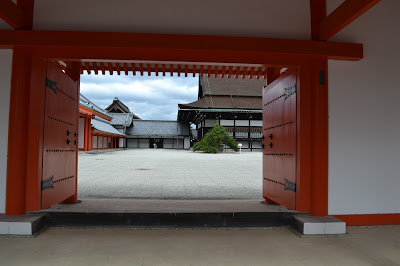
Entrance, Kyoto Imperial Palace - www.curiousadventurer.blogspot.com
Sheishomon Gate, the main entrance gate

Once again, I was glad that we booked this tour through JTB USA. They took care of securing the required visitor's permits. Otherwise, we would have had to apply for entry and risk not getting permission on that same day.

Before entering the palace grounds, our JTB tour guide asked the group to form a line with rows of four people. For a moment, I felt as though I was in the military. I glanced at the roofed perimeter wall. It seemed to go on forever.

Massive roofed wall, Kyoto Imperial Palace - www.curiousadventurer.blogspot.com
The Kyoto Imperial Palace is surrounded by a massive roofed earthen wall.

I couldn't help notice how spotless it was here. I wish the rest of the world would adopt the Japanese way of keeping surroundings perfectly clean.


Okurumayose, Kyoto Imperial Palace - www.curiousadventurer.blogspot.com
The Okurumayose entrance used by official visitors granted permission to enter the Palace precincts.

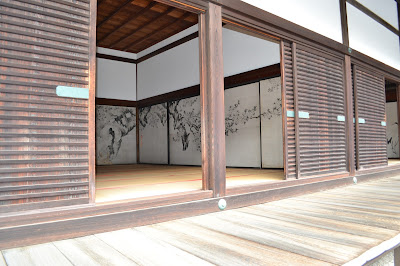
The tour guide led us to the Shodaibunoma building. It was used as a waiting area by dignitaries paying official visits to the Palace. The dignitaries were ushered into three separate ante rooms depending on their rank. The rooms are arranged from highest rank (east) to lowest (west).

Each room is easily identified by the paintings on the sliding panels or fusuma:
     1.  Highest ranked room = Toranoma (Tiger Room)
     2.  Second highest ranked room = Tsurunoma (Crane Room)
     3.  Third highest ranked room = Sakuranoma (Cherry Room); also called the Shodaibunoma

Shodaibunoma, Kyoto Imperial Palace - www.curiousadventurer.blogspot.com
The separate waiting rooms of the Shodaibunoma

Cherry Room, Shodaibunoma, Kyoto Imperial Palace - www.curiousadventurer.blogspot.com
The Cherry Room, the third highest ranked room.

Crane Room, Kyoto Imperial Palace - www.curiousadventurer.blogspot.com
The second highest ranked room is the Crane Room with cranes depicted on the sliding doors.

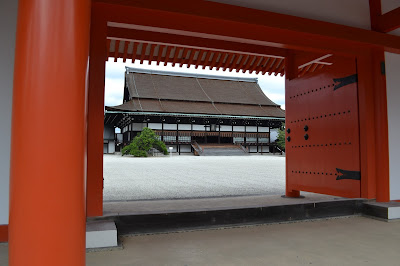
The most commanding structure is the Shishinden. As the Hall for State Ceremonies, it is where they held important ceremonies such as the Emperor's coronation. It is fronted by a pristine garden of white gravel.

Shishinden, Kyoto Imperial Palace - www.curiousadventurer.blogspot.com
Shishinden, the main building, with a courtyard laid with white gravel

Shishinden, Kyoto Imperial Palace - www.curiousadventurer.blogspot.com
View from another entrance into the Shishinden

This ceremonial hall is a one-story wooden building with a roof made of hiwada or layers of cypress bark. Our tour guide explained that it takes several cypress strips (did she say a thousand?) to create just one square meter of hiwada roof.

The large and ornate gates were also eye-catching. This one is adorned with a distinctive detail: the chrysanthemum seal, a crest used by the Japanese Imperial family. Can you find it in this photo?

Kenreimon Gate, Kyoto Imperial Palace - www.curiousadventurer.blogspot.com
Just one of the tremendous gates of the palace. This is the Kenreimon Gate.

Then there's the Shunkoden or the Sacred Mirror Hall. See how it has a different roof? Its roof is made of copper plates instead of the typical cypress bark layers. This structure was specifically built to house the sacred mirror during the enthronement of Emperor Taisho in 1915. (In Buddhism, the mirror is a significant symbol of man and the universe).

Shunkoden, Sacred Mirror Hall, Kyoto Imperial Palace - www.curiousadventurer.blogspot.com
The Shunkoden or Sacred Mirror Hall

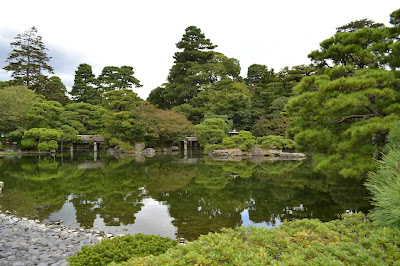
Another favorite scenic spot is the strolling garden called Oikeniwa Garden. It features the beautiful Keyakibashi Bridge across a serene pond. This garden is absolutely stunning!

Keyakibashi Bridge, Oikeniwa Garden - www.curiousadventurer.blogspot.com
The Keyakibashi Bridge that stretches across the pond of the strolling garden.


Oikeniwa Garden, Kyoto Imperial Palace - www.curiousadventurer.blogspot.com
The breathtaking pond of Oikeniwa Garden features an artificial shoreline.

And finally, we marveled at the Otsunegoten, the largest building here. It has 15 rooms and became the main residence of the emperors from the 16th century until the capital was transferred to Tokyo.

Otsunegoten, Kyoto Imperial Palace - www.curiousadventurer.blogspot.com
The impressive Otsunegoten

Otsunegoten, Kyoto Imperial Palace - www.curiousadventurer.blogspot.com
A close look at the painted sliding doors inside one of the Otsunegoten rooms.

At the end of the tour, we were each handed a paper amulet -- a slip of paper inscribed with Japanese characters representing luck. "These are only good for one year," our tour guide teased. "To renew, you must come back for another visit."


Continued from Golden Reflections (Kinkaku-ji Temple).


Sunday, August 30, 2015

Golden Reflections

Kinkaku-ji Temple
October 9, 2014
Part Two of JTB Tour 1


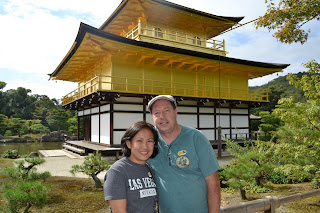
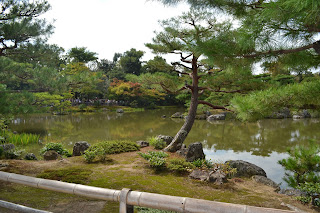
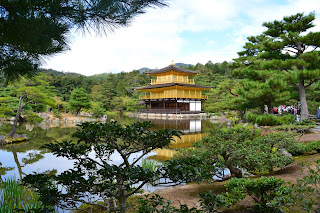
I've only seen it in pictures before. But to finally see it in person? I'm speechless! The gold-leaf covered floors of Kinkaku-ji Temple make it a striking sight. Even the surrounding pond, with its still waters, boasts a reflection that is just as stunning.

Kinkaku-ji Temple, Kyoto - www.curiousadventurer.blogspot.com
Even with so many tourists, we were able to take our turn in getting a good photo.

Kinkaku-ji Temple, Kyoto - www.curiousadventurer.blogspot.com
The Kinkaku-ji Temple (or Golden Pavilion) in all its splendor

Reflective Pond, Kinkaku-ji Temple, Kyoto - www.curiousadventurer.blogspot.com
View of the reflective pond from the opposite side

The second part of JTB USA's Kyoto morning tour brought us to this popular site. It's highly recommended for first-time visitors to Kyoto.

First Gate, Kinkaku-ji Temple, Kyoto - www.curiousadventurer.blogspot.com
Seen at the First Gate: Tourists and students flocking to the world heritage site

First Gate, Kinkaku-ji Temple, Kyoto - www.curiousadventurer.blogspot.com
Five golden rules to follow at the entrance

The original villa in this area was owned by a statesman named Saionji Kintsune. A shogun named Ashikaga Yoshimitzu bought it from him in 1937 and then built his own villa. After Yoshimitzu's death, and as a fulfillment of his will, the villa was converted into a Zen Buddhist temple.


Kinkaku-ji Temple, Kyoto - www.curiousadventurer.blogspot.com
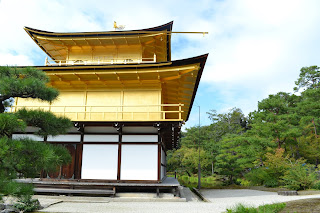
The second and third floors are covered with gold foil on lacquer. At the top, is a golden phoenix.

Each floor of this temple represents a different architectural style:
1st floor - built in the Shinden style used for palace buildings (11th century imperial aristocracy)
2nd floor - built in the Bukke style used in samurai homes (warrior aristocracy)
3rd floor - built in the style of Chinese Zen Hall

Kinkaku-ji Temple, Kyoto - www.curiousadventurer.blogspot.com
Each floor depicts a different architectural style

The pavilion is not open to the public so we weren't able to go inside. I later learned that one might be able to spot the statues of the Shaka Buddha and Yoshimitzu on the first floor. I wish I had known this beforehand. Across the pond, the statues would have been viewable through the open windows of the first floor. I didn't see them but you can find photos here.

Kinkaku-ji Temple, Kyoto - www.curiousadventurer.blogspot.com
Statues inside the first floor can be viewed through its open windows

The garden, with the pond and the Golden Pavilion, is definitely a place of Zen. It deserves the title "Special Place of Scenic Beauty." Our JTB tour guide gave us enough time to roam around and stroll through the gardens. There's so much to discover.

If you ever visit this beautiful place, make sure to look for the Ryumon Taki or Carp Rock. A waterfall cascades onto this rock that looks like a carp trying to swim upstream. The story is that the carp rock symbolizes strength, courage, and the will to persevere in times of adversity.

Ginga-sen, Kinkaku-ji Temple - www.curiousadventurer.blogspot.com
This is the Galaxy Spring or Ginga-sen. The shogun Yoshimitzu used water from this spring for his tea ceremony.

600 year old bonsai, Ginga-sen, Kinkaku-ji Temple - www.curiousadventurer.blogspot.com
The 600-year old bonsai tree in the shape of a boat.

Fudo-do, Kinkaku-ji Temple - www.curiousadventurer.blogspot.com
This shrine houses the stone statue of Fudo-do, known for miraculous powers.

From some of the photos above, you couldn't tell that there were so many tourists. It was challenging to get photos without unwanted people in the shot. Thankfully, the tourists were gracious enough to allow each one to take his turn in getting a good photo. But don't let that discourage you. Visiting this historic site is worth every minute.


Continued from Nightingale Floors.


NOLA 300 - Mardi Gras and New Orleans

This blog has moved to a new site:   curiousdonna.com/blog Read about  NOLA 300   here .